November 5, 2010

Tutorial: Embroidered Nursery Art

Keeping on the a la cheap theme - I've just made a new piece of artwork for our nursery.  I've been re-organizing the space since it will soon house 2 little girls. 

Here's what you'll need to make the Embroidered Nursery Art

We haven't completely decided on a name yet for the baby coming in January but the project was so quick and easy I decided to use the first inital anyways.  Any guesses on the name for the the letter "H"?

I got these frames last year at a local thrift store and spray painted them yellow.  But I couldn't decide what to do with them until now.  The frames are pretty small - about 5 x 7.

I used a piece of linen from my scrap pile and found a cool font in Microsoft Word.  Print it out and trace the design with some carbon transfer paper underneath.  You could also just try to trace the design by holding the linen over the printout in a sunny window.

Embroider the letters with the smallest stitches possible.  You can search for a video on how to embroider if you haven't embroidered before.  It's actually pretty easy.  I used a back stitch.  This actually is a great project to do while watching "The Office" or "Parenthood".  Two of my favorite shows.

Then, trace 2 ovals the size of the opening on some cardboard and cut them out.  I used an Oatmeal Squares cereal box.

Using some leftover embroidery floss or thread - make a running stitch around the design leaving an inch outside of where the cardboard circle will be.

This part can get tricky - now pull the loose ends of the running stitch taut and place some batting or  fabric scraps inside to "pouf" the design. Slip one piece of cardboard just inside the running stitch.  Tie the running stitch ends closed. 


I had to play around with the cardboard and the batting to get the design more or less centered and evenly "poufed".  I thought it needed to be stretched a bit more - so I laced it up the back with another set of stitches in a zig zag pattern.

Add some hot glue to the back and lay the second piece of cardboard to cover your stitches in the back.

Then run a small bead of glue along the lip of your picture frame and carefully place your puffy embroidery inside.  Don't stop to take a photo or the hot glue will become cold glue!
I hope you at least give embroidery a try!  The embroidery floss only costs 29 cents and needles are cheap too! 

This would also look great with a silhouette or in a square frame with the entire name embroidered. 

Holiday gifts anyone?

November 3, 2010

FREE PATTERN: Snug Shrug Pattern and Tutorial

How adorable are little girls in ruffles?  
 

I know there are other mamas who don't want to waste money (or time sewing) on a cute holiday dress that will go unworn simply because it's too chilly outside! 

The weatherman predicts snow flurries tomorrow in Minnesota - so in anticipation - and with trepidation - I give you the SNUG SHRUG.  

 
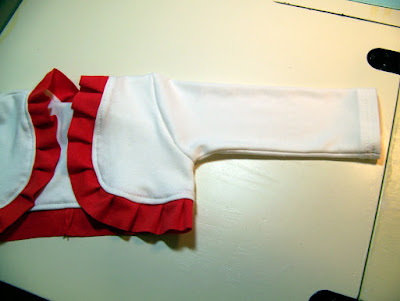
It's a cozy little shrug for babies and toddlers.  Sizes: 3m, 6m, 12m, 18m and 24m.  I made the size 18m for little Lucy.


The pattern is made for knit fabrics so there is no ironing involved!  I love when you can wear clothes right out of the dryer!
 

 For a more sophisticated, tailored look, you can use the pattern one size larger than your child with your favorite woven cottons for a holiday cover-up!
 It would look adorable with a few little buttons or some fancy trim!

The Snug Shrug Tutorial
Sizes: 3m, 6m, 12m, 18m, 24m

Materials: 
1/4 yard cotton interlock (med. weight knit fabric) 
1.5" x 43" of knit ribbing (1x1 rib) 
sewing machine
thread
pins
sharp scissors or rotary cutter
iron and ironing board
*you CAN use this pattern for woven fabrics - just use the pattern pieces one size LARGER than your intended recipient.

Directions: 
1.  Print the pattern pieces.  Make sure to select "print actual size" or "no scaling".  Trim the margins of each page with scissors and tape pages together.  

Click here to dowload -  Snug Shrug Pattern Pieces

2.  Using a rotary cutter or scissors, cut the pattern pieces out of your fabric.  Make sure the greatest stretch of the fabric is always width-wise to the body.  It should go around the body and NOT stretch vertically or it will look droopy. 
 
3.  Sew the side seams and shoulder seams using a 3/8" allowance.  Do this for the both sets of bodice back/front pieces.  You should have 2 vest/shrug-like pieces.  Press the seams open.

4.  Find the center of your long ribbing piece.  Pin it to the center back on one of the shrugs.  I use my thumb as a guide to space the pleats.  Pleat the ribbing every 1.25" or so, overlapping only .25".  Pin generously. 
This is the center back of the shrug.  
Notice how the center back pleat looks like an inverted box pleats.  This way, the pleats will all face "down" on either side of the shrug. 
 
5.  Pleat only until you get to the side seams.  Leave a gap in the center back.  I widened the gap to about 1.5".  
 
6.  Sew the ribbing pieces together with the right sides (the sides touching the white fabric) together.  Stretch the ribbing slightly and pin the center back and halfway between the side seam and center back.  The shrug fabric will bunch slightly.  This is desirable and will make the ribbing "hug" the body. 

7.  Baste the ribbing to the shrug using a long straight stitch.  It should be one continuous (albeit curving) seam line. When you get to the bottom/back portion, stretch the ribbing slightly as you sew.

8.  With your ruffle basted shrug right side out - place the 2nd shrug on top, right sides together.  Match the side and shoulder seams.  Pin well.  Your ruffle will be encased within the 2 layers.

9.  Sew around the shrug just inside of your basting lines.  Clip the seam allowances to reduce bulk and clip curves if necessary (if they don't lay down flat).
 
10.  Turn right side out through one armhole and press the edges well, tugging gently at the ribbing.  Topstitch through all layers (from the right side) .25" or closer to the ribbing. 

11. The sleeves!  Now fold up the hem of the sleeve .5" to the wrong side.  Press.  Fold again .5" to the wrong side.  Press again!  I hate pressing but it gets the job done right!

12.  Sew 2 lines of stitching to secure the sleeve hem.  For small garments it's easier to hem the sleeve before you attach it to the garment. Shucks - it's hard to see my super straight stitching lines!  (The other sleeve was a bit wonky.)
 

Sew down the length of the sleeve, making into a tube.  Press the seam allowance to one side and tack it down with a few zig zags at the end of the sleeve.
 I'll try to take tutorial photos during daylight hours next time!! 
13.  Place shrug right side out and sleeve right side out.  Match sleeve seam line at bottom to the shrug side seam and the center top of the sleeve to the shoulder seam on shrug.  Pin well.  
14.  Sew sleeve using 3/8" allowance.  With right sides out, press well.  Repeat for other sleeve!  
Viola!  A sweet shrug for your sweet little one!
Note: I went back and zig zagged over my seam allowance at the center back so that it lay flat.  Not sure if it was necessary or not, but it bugged me!

The woven cotton version!  I think I might add 3 little white buttons on either side.  Non-functional, of course - but cute!

It sure looks cozy!
And that's it!  How snug is your little bug?

Feel free to share photos of your Snug Shrug in the flickr pool!


November 1, 2010

Costumes

How was your halloween?  It's always been one of my favorite holidays.  Maybe it's the candy or the costumes or the sugar high memories.  This year Mr. Owly agreed to dress up with me and little L, so I got to create costumes for the whole family!
We did some late-night Google "research" and learned males gnomes wear blue tunics and belts (check!).  Apparently female gnomes wear green hats and skirts after marriage (oops)!  I hope no gnomes are insulted by our mistakes! I made our mushroom gathering aprons, red hats, green tunics and Mr. Owly's white beard.  

One little trick-or-treater had a few suggestions for us 
"Are you supposed to be a yard gnome?" 
-Yes. 
"Well then shouldn't you be in the yard?"

We pranced around the neighborhood, took in some spooky sights, and (of course) ate some candy!  
I hope your Halloween was frightfully good!


Related Posts Plugin for WordPress, Blogger...