Showing posts with label how to. Show all posts

October 2, 2012

Shorts on the Line - FREE PATTERN!

This is a repost from the SHORTS ON THE LINE series.
-----------------------
Hi everyone!  I'm Becky and I like to sew.  I blog at Owly Baby and sell children's sewing patterns at Owly Baby.com

I'm so excited to be a part of the Shorts on the Line series that I've made 3 pairs of shorts in one week!  This doubles the amount of shorts in my wardrobe.  A bit of selfish sewing makes me feel pampered!

In order from left to right - 
The SWEET SCALLOP SHORTS from Pattern Runway on Etsy (for sale HERE). 
My very wearable (4 days in a row!) turquoise tester/muslin cuffed shorts. (self drafted pattern)
My super stylish leopard cuffed shorts.  (self drafted pattern, FREE pattern link below)


SWEET SCALLOP SHORTS (pattern: Pattern Runway)

The fit was great on the Sweet Scallop shorts from Pattern Runway.  The instructions were very clear and included tips on fitting and choosing the right size.  The cutting and sewing diagrams were very helpful and I learned how to sew a single welt pocket.  These shorts would be great for a motivated beginner or intermediate sewer.

I didn't think the welt pockets would go well with the casual look I was going for, so I did make a few adjustments. I didn't apply any pockets to the backside, I shortened the overall length 1" and added the scallop shape to the back of the shorts.  I redrafted the back hem facing and added a drawstring waist instead of a side seam invisible zip.  

scallops hem on back
I love the scallop shape at the hem and even though they are drawstring shorts (and feel like jammies), they still feel nice enough to wear out for errands and playdates.  I do have to wiggle a little to get them over my hips, and in hindsight I should have added .25" on each side seam because I did remove the side zipper, but it hasn't overly strained any of the seamlines yet.

The fabric is a Lisette Twill from JoAnn's.


CUFFED SHORTS - FREE PATTERN from Owly Baby

Now, on to the turquoise testers and fancy leopard shorts. Lucky readers, you also get to join in the sewing shorts fun.  I'm sharing my pattern with you for FREE!  It will fit anyone who wears a Ready-to-Wear size 4 (store sizing).  For reference, it should fit a 29" waist, 37" hip.  It is a self drafted pattern that is not entirely perfect - I've only used twice, but I have been wearing my shorts non-stop!  They fit great on me, so if you're around the same size - I hope they will work for you.   

First zipper and belt loops!
The center back seam has been modified - shallower curve.  The back legs will also "hug"
closer to legs than shown in this muslin.

I've also written up some instructions for you to follow that include helpful links on how to sew single and double welt pockets, AND how to sew a fly zipper.  This was my first time sewing using a fly front zipper AND a welt pocket (and belt loops!).  If I can do it, you can too!  Click below for the FREE PATTERN and instructions.


FREE Cuffed Shorts Pattern Pieces (Size 4 RTW)

This pattern is for personal use only.  
Copyright Rebecca Ruud, 2012.   All Rights Reserved.
This leopard fabric has definite stretch, refuses to be ironed and snags easily.  
It was horrible to work with but it feels wonderful to wear!

In short (pun intended):  I've been wearing my three new pairs of shorts non-stop!  They were totally worth the effort and I loved learning how to put in the fly zipper.  I am now putting in fly zippers in EVERYTHING!


I hope you're inspired to join the Shorts on the Line Sewalong and win some fabulous prizes! 


Happy sewing and shorts-wearing!


VERY Helpful links:

February 6, 2012

Curved Nine Patch Block Tutorial

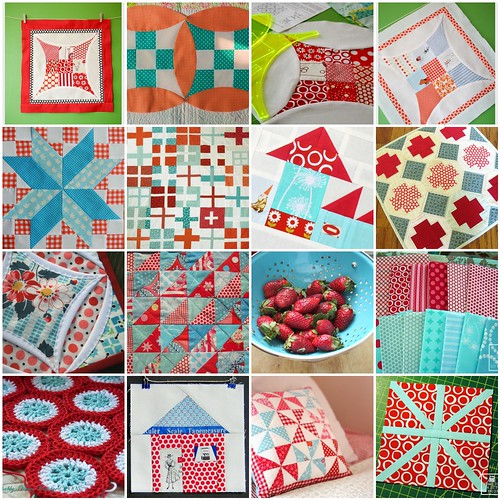
February Block Inspirations by owlybaby
February Block Inspirations, a photo by owlybaby on Flickr.

These are my inspiration photos for my February Bits and Pieces Bee.  The top 4 photos (row 1) show the block that we will be making and the bottom 3 rows show my color inspirations.  I know I'm super late to the aqua and red party, but the colors look so fresh together.  Especially when I see juicy strawberries in a beautiful aqua colander! 


The pattern for this block can be found HERE.  It's a free pattern from ConnectingThreads.com called Curved Nine Patch.  You will only need to print out the last page of the document with the template pieces.  

I'm hoping people will do either 1 block of red and 1 block of aqua OR two blocks of aqua.  I was pulling fabrics from my stash and noticed that I have lots of red fabrics but very few aqua fabrics.  If you aren't afraid of curved piecing, it would be great if you could add the white curve to 2 sides of each block.  You don't need to add it to each side because the block "share" this piece. (this is not shown)


CURVED NINE PATCH TUTORIAL
So, let's get started! These instructions will cover the steps you will take to complete one block.  

You will need the template pieces A, B, C and D.  We are going to modify template piece D.  
To modify piece D - Cut out the template piece on the solid lines for the curved side and notches for cutting at the top and bottom.  Cut along the DOTTED LINE for the long straight edge.  Then, on a new sheet of paper, trace around the entire piece.  Flip the pattern piece right side down and align the long straight edge of the template with the long straight edge that you have just drawn.  Trace the curve and notches on this side.  You will end up with a long oval-ish template piece.  This is the new template D.  Don't worry too much about marking the middle.  


Now, you will need to gather your fabrics and cut the following pieces.  
Piece A - cut 1.  This is the center block.  
Piece B - cut 4.  Notice the slight curve in one side.  
Piece C - cut 4.  
Piece D - use white fabric.  Cut 2 per block. 

Arrange your pieces until you are happy with the layout. 


Now comes the sewing! Join the pieces using a .25" seam allowance.  Sew 3 rows of squares together.  Don't forget to face the curved edge on piece B to the outside.  Yes, I changed my layout - sorry about that! 
Now, join your rows.  I pressed my seams open, but I don't think it will matter too much in this block.
Make another block, if desired.  


Follow these directions to add the curved white piece.  Never fear, curved piecing is a breeze and nothing to be worried about.  First, fold piece D and your nine patch block to find the centers.  Match the centers up and pin.  


Then, match up each corner piece and pin.  If you are brave or experienced, you can usually skip this part. 
If pins make you feel more in-control, add one more pin between the center and edges on each side. 

Now, I find it easiest to sew with the convex piece on the bottom.  Sew along the curved edge, matching edges as you go.  Take care not to stretch or pull fabrics, but gently guide the edges so they curve together.  I like to match the edges as I go and work 3 inches or so in front of the presser foot.  Notice - to the left of the presser foot there are *gasp* bubbles.  These are necessary at this point.  They will extend almost to the .25" seam allowance but not to the edge.
After sewing, you will have a bowl-ish shaped edge. 
March it over to your pressing board and press the seam allowance away from the white piece.  
 Now, repeat the last step for one other edge.  How about we all plan to do the opposite edge? 

If you'd like to know how to join the pieces together to make a quilt, just continue adding nine patches and curves until it's you're desired size.


Thanks so much to the great ladies from the Bits and Pieces Quilting Bee.  I'm so excited to see your blocks!!  Also - if you don't have enough fabric of the correct color to make a block, let me know and I'll happily mail you a package! 

August 8, 2011

Today I learned...

That when it's awfully quiet - your 2 year old might be playing with Sharpie permanent markers. 

On the wooden furniture. 

That was handmade by your husbands grandfather. 

YIKES!

But thanks to Google - I also learned that Colgate TOOTHPASTE will remove all those permanent marker lines, circles and dots that were so carefully placed on the desktop.  It takes some elbow grease but all the marks are gone.

I thought I'd mention this just in case you might need that handy bit of cleaning info in the future.  Google also says that Colgate will remove scratches from DVD's.  Good to know.

And now Lucy keeps repeating "Naughty - drawing on desk."

January 14, 2011

HOW TO: Clean your Sewing Machine and Serger

I love my serger.  To make sure that it loves me back (and doesn't tangle threads and eat fabric) I try to keep it happy be cleaning it once a month.  
 

Can you see all that yucky lint and dust buildup?
How often should I clean my sewing machine or serger?
I've read and heard many different opinions on how often to clean and oil your machines, but once a month seems to work for me.  Mind you, I sew almost every day.  
Anytime your machine sounds loud, rough or thump-y means that you have waited to long.  I think it all depends on the newness of your machine and how much you use it.  If you're questioning whether or not to clean it - it's time.

How do I clean it? 
First, make sure you're not wearing black clothing...I learned this one the hard way.
The dinky little brush (on the far left) that came with my machine is only fit for house gnomes!  
I quickly learned that I needed a bigger brush if I wanted to finish the task in less than a day.  You can use an old makeup brush (wash the makeup off), or you can find larger brushes in the notions aisle of Joann Fabrics.  I've also used the spiral brushes made for cleaning baby bottles and nipples.  

Remove the throat plate on your sewing machine (don't forget to dust the underside of the plate) or open the front door of your serger.  Don't be afraid to use that little screwdriver to get access to all those nooks and crannies.
I happen to have a drop-in bobbin on my brother sewing machine.  Your sewing machine might look different, but clean is clean on any machine!  Just make sure to remember how things were arranged before you take them apart - take photos if necessary.

My throat plate and screwdriver.  

Can you see the fuzzies and lint?  You can also remove the bobbin and the race (bobbin holder) to dust and oil the machine. 

My dirty serger - BEFORE
Gently brush away ALL visible lint and build up.  I tend to stab at the dust and it clings to the brush - then I lift it out and use my hands to clean the brush before gathering more lint and dust. 
The tweezers are great for the big globs of lint and fabric that might get pushed back into the corners.
After I've brushed away all the visible lint and dust, I take my vacuum cleaner and gently suck out any lint or dust that is hiding out of view.  Just hold the nozzle attachment close to openings or hard to reach areas.  Again, work gently.

AFTER - In this photo the race has been removed and oiled. 

Ah - the clean machine looks so much BETTER!


Try to avoid blowing the dust away with your breath or a canister of compressed air. It will blow the dirt and dust deeper into the machine - usually to places you cannot reach.
How do I oil it?
Take out that dreaded manual.  It should have a little diagram of your sewing machine or serger pointing to the spots you need to oil.  Both of my machines take very little oil.  I've labeled the spots I need to oil with a red sharpie and that seems to have taken out the guess-work.  It usually takes just a small dab (1 drop) of oil.  Use sewing machine oil only. 

Notes:
-This is also a great time to change your needles or serger blades.  I like to write the date I changed my serger blades in sharpie marker right on the blades.
-Listen to your machine as you sew - it should sound quieter and smoother after a cleaning.
-It is recommended that you unplug your machine from the power supply before doing any maintenance.

If you have any tips or tricks you use to clean your machines - please let me know!

HAPPY SEWING!
Related Posts Plugin for WordPress, Blogger...