
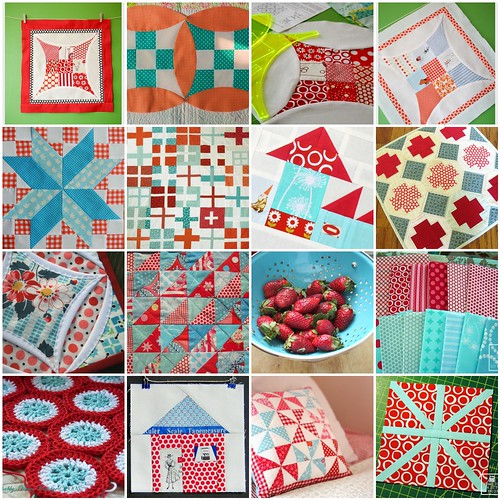
February Block Inspirations, a photo by owlybaby on Flickr.
These are my inspiration photos for my February Bits and Pieces Bee. The top 4 photos (row 1) show the block that we will be making and the bottom 3 rows show my color inspirations. I know I'm super late to the aqua and red party, but the colors look so fresh together. Especially when I see juicy strawberries in a beautiful aqua colander!

The pattern for this block can be found HERE. It's a free pattern from ConnectingThreads.com called Curved Nine Patch. You will only need to print out the last page of the document with the template pieces.
I'm hoping people will do either 1 block of red and 1 block of aqua OR two blocks of aqua. I was pulling fabrics from my stash and noticed that I have lots of red fabrics but very few aqua fabrics. If you aren't afraid of curved piecing, it would be great if you could add the white curve to 2 sides of each block. You don't need to add it to each side because the block "share" this piece. (this is not shown)
CURVED NINE PATCH TUTORIAL
So, let's get started! These instructions will cover the steps you will take to complete one block. You will need the template pieces A, B, C and D. We are going to modify template piece D.
To modify piece D - Cut out the template piece on the solid lines for the curved side and notches for cutting at the top and bottom. Cut along the DOTTED LINE for the long straight edge. Then, on a new sheet of paper, trace around the entire piece. Flip the pattern piece right side down and align the long straight edge of the template with the long straight edge that you have just drawn. Trace the curve and notches on this side. You will end up with a long oval-ish template piece. This is the new template D. Don't worry too much about marking the middle.
Now, you will need to gather your fabrics and cut the following pieces.
Piece A - cut 1. This is the center block.
Piece B - cut 4. Notice the slight curve in one side.
Piece C - cut 4.
Piece D - use white fabric. Cut 2 per block.

Arrange your pieces until you are happy with the layout.

Now comes the sewing! Join the pieces using a .25" seam allowance. Sew 3 rows of squares together. Don't forget to face the curved edge on piece B to the outside. Yes, I changed my layout - sorry about that!
 Now, join your rows. I pressed my seams open, but I don't think it will matter too much in this block.
 Make another block, if desired.

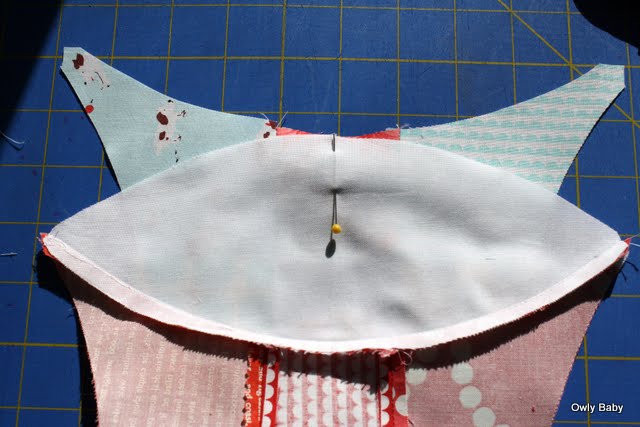
Follow these directions to add the curved white piece. Never fear, curved piecing is a breeze and nothing to be worried about. First, fold piece D and your nine patch block to find the centers. Match the centers up and pin.

Then, match up each corner piece and pin. If you are brave or experienced, you can usually skip this part.

 If pins make you feel more in-control, add one more pin between the center and edges on each side.
Now, I find it easiest to sew with the convex piece on the bottom. Sew along the curved edge, matching edges as you go. Take care not to stretch or pull fabrics, but gently guide the edges so they curve together. I like to match the edges as I go and work 3 inches or so in front of the presser foot. Notice - to the left of the presser foot there are *gasp* bubbles. These are necessary at this point. They will extend almost to the .25" seam allowance but not to the edge.
 After sewing, you will have a bowl-ish shaped edge.
 March it over to your pressing board and press the seam allowance away from the white piece.


Thanks so much to the great ladies from the Bits and Pieces Quilting Bee. I'm so excited to see your blocks!! Also - if you don't have enough fabric of the correct color to make a block, let me know and I'll happily mail you a package!

Arrange your pieces until you are happy with the layout.

Now comes the sewing! Join the pieces using a .25" seam allowance. Sew 3 rows of squares together. Don't forget to face the curved edge on piece B to the outside. Yes, I changed my layout - sorry about that!


Follow these directions to add the curved white piece. Never fear, curved piecing is a breeze and nothing to be worried about. First, fold piece D and your nine patch block to find the centers. Match the centers up and pin.

Then, match up each corner piece and pin. If you are brave or experienced, you can usually skip this part.

 If pins make you feel more in-control, add one more pin between the center and edges on each side.
 Now, I find it easiest to sew with the convex piece on the bottom. Sew along the curved edge, matching edges as you go. Take care not to stretch or pull fabrics, but gently guide the edges so they curve together. I like to match the edges as I go and work 3 inches or so in front of the presser foot. Notice - to the left of the presser foot there are *gasp* bubbles. These are necessary at this point. They will extend almost to the .25" seam allowance but not to the edge.


Now, repeat the last step for one other edge. How about we all plan to do the opposite edge?
If you'd like to know how to join the pieces together to make a quilt, just continue adding nine patches and curves until it's you're desired size.


Thanks so much to the great ladies from the Bits and Pieces Quilting Bee. I'm so excited to see your blocks!! Also - if you don't have enough fabric of the correct color to make a block, let me know and I'll happily mail you a package!
Fantastic tute, Becky! I love the gnome and red kerchief girl! Geez, your combination of fabrics is yummy...
ReplyDeleteGreat tutorial. Thanks for showing how you do it!
ReplyDelete