Showing posts with label projects. Show all posts

January 27, 2012

A video tutorial! Foundation Paper Piecing

So - I'm trying to get my sewing mojo built up to tackle some of the blocks in my Patchwork 318 book.  So, without much preamble and scant forethought - here is my first video tutorial.  The 3 videos turned out much longer than I thought they would - so just skip the parts you already understand!
Toddler-practicing-scissors unfortunately happened at the bottom of the block this morning.  Arg!

I will be making the coffee mug from the pattern graciously provided by the talented Kerry of VeryKerryBerry.blogspot.com using the foundation paper piecing method. The foundation paper piecing method I use is slightly different than the freezer paper method that she demonstrates.

Part 1 - Foundation Paper Piecing setup and Mug Handle assembly

Part 2 - Attaching the mug handle to the mug *body*


Part 3 - Finishing steps, paper removal, reveal!

I'm not sure if I'll do more video tutorials - I didn't know I was so long winded!!  It's odd to watch yourself in a video!

January 13, 2012

Made By Rae Toddler Backpack

We've recently started going to an Early Childhood Family Education class.  After our few potty sucesses this week - I was so excited that I might be able to bring extra pants and undies to class.  So, in anticipation of "class" I whipped up a toddler backpack using the pattern from Made By Rae. 

The bag is the perfect size for this *almost* 3 year old.  Lucy informed me that she wanted an "elephant pack-pack".  So - a little piping, interfacing, home decor fabric later - we are ready for "class".  Unfortunately there are no undies yet, just diapers.  But I'm still hopeful. 

Here's the backpack.  The photos make Lucy's hair look red, but it's just from the indoor lights.  I'll try to add some better photos after naptime. 


I should add that this pattern is wonderfully written, easy to follow and offers tips to enlarge the pattern or add a lining.  I did neither of those options but will likely line the bag sometime in the future. 

October 18, 2011

:: On the work table ::

A jumper in progress.

It will be a new pattern sometime in the future.  I really hope sooner rather than later.

The center front is still a bit too wide (at the top) and the back requires some minor adjustments to allow for the zipper.  Otherwise I like it and Lucy LOVES the pockets.  What do you think?


Not sure if this counts, but on the work - floor there is another quilt in progress.  Christmas gift making is already in full swing around here.  It's a broken dishes block put together with some beautiful Anna Maria Horner Loulouthi fabrics, some solids and one Joel Dewberry Aviary 2.


Happy sewing everyone!

September 15, 2011

Quilt Blocks - 318 Patchwork Patterns

This is my test block for my new quilting bee group.  The group is called "geese in a ring" and there are some BEAUTIFUL blocks up so far!  I already feel like I'm falling behind!

This is my new quilting book.  It's called 318 Patchwork Patterns by Kumiko Fujita.  You do need to know a bit about paper piecing because there are no instructions (and it's in Japanese). 


I can't wait to try the ice cream cone block.

Or this adorable duck block.  Perfect for a baby quilt.  Look at how the stripes match up...amazing!

This is probably my favorite page so far.  I'm savoring the book...ever so slowly studying each page.

September 2, 2011

Bits and Pieces Quilting Bee

Untitled by delightful disarray
Untitled, a photo by delightful disarray on Flickr.
Guess what!  I'm in a quilting bee! Doesn't that sound so old fashioned?
I'm so excited to start doing more quilting and the quilting bee makes it even more fun.

The piecing of a quilt top is usually such a solitary and sometimes boring activity.  I love that in the quilting bee I'll be making new and different blocks based on their visions for the quilts AND that I get to share all of these experiences with another group of crafters!  It's so exciting!

Click on the play button to check out the great blocks from these lovely ladies (all of whom I still have yet to "meet"!).  Can you hear my enthusiasm yet? 

August 17, 2011

Knitting Bag Refashion


I would include a tutorial but it's too easy!  All you need is a seam ripper.  Rip apart the existing fabric on the musty, stained knitting bag.  Then trace the pieces onto your favorite fabrics and reassemble.  The only thing I really changed was to add more pockets!  Each bag has 3 medium sized pockets and 2 dpn or pencil pockets.  The larger bag also has a pattern pocket.

The fabrics I used for the large bag are Amy Butler's Morning Glory in Linen, Full Moon Polka Dot in Slate and Red.  It is quite large - the pocket with the flowers is holding an 8.5 x 11 piece of paper - perfect for your knitting patterns!


For the smaller bag I used Paula Prass' Woodland Delight Brick Path in Brown, and Flights of Fancy Summer Fretwork in Summer.  It was basically the same process - rip apart and put it back together in reverse order.  I did have to hand sew them to the frames, but it didn't take a horribly long time.

This bag would be the perfect size for knitting hats, kids sweaters, socks, mittens and other smaller projects.  


HINT:  If it's hard for you to remember in what order you need to sew things together, just take a photo after ripping each seam apart and sew it together in the reverse order.

Both of these bags are for sale HERE in my Etsy shop. ($45 for the large bag - SOLD, $32 for the small bag -SOLD).

August 16, 2011

The Quilting Bug

I've been stung by the quilting bug lately.  I've churned out 2 (almost 3 quilts) this past month.  It could be due to the cooler weather.  Who knows?  My goal is to have a lap quilt for everyone in the family by the time winter sets in.  Lucy's is finished.  Hattie's will be an I-Spy quilt with lots of little pictures and colors.  Mine will have some Flea Market Fancy fabrics that I've been collecting.  I'm not so sure about the Hubby's quilt yet - he's not too picky.

I thought I'd give you my whole quilt history - just for fun.

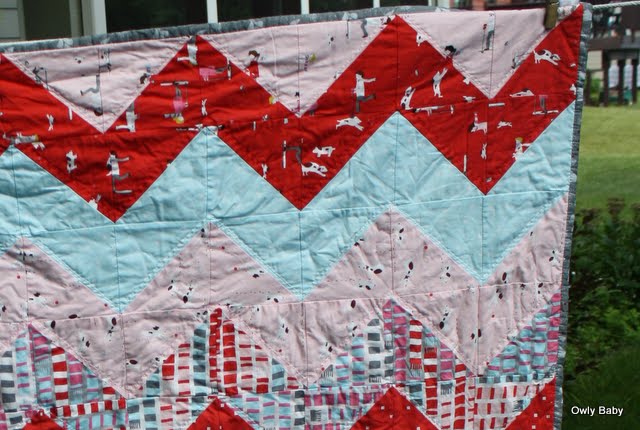
Lucy's Zig Zag Quilt, 2011

It all started with a move to the "big girl" bed.  So I used some precious Sherbert Pips fabric and a modern zig zag/chevron pattern.  I hand-quilted it using perle cotton because I liked the large, chunky stitches. I'm fairly pleased with the outcome.  The back is voile from Anna Maria Horner and it's very soft and cuddly.  It was my first time applying binding with my sewing machine and it turned out well enough to evade the seam ripper.

My first quilt -made for Charlie, 2003
 Not bad for my first quilt.  It's twin sized and get this -completely hand pieced AND hand quilted.  I started making it for him as our 1 year anniversary (of dating) gift and didn't have access to a sewing machine.  I was working at Bible Camp and picked out all the fabrics at our local WalMart.  The design and colors are not especially beautiful, but the sentiment is nothing short of amazing.
This is a close up of the border.  I wrote his name in cursive and then quilted it.  My favorite detail yet.

Vintage Quilt Blocks, 2006
This is my favorite quilt to cuddle with.  The vintage quilt blocks were given to me by a friend who thought I might enjoy them.  They are super soft and each one has a bit of character.  Again, this was made with fabrics from WalMart (I didn't know there existed stores for just fabric!) and a piece as you go effort.  I obviously didn't know to buy enough fabric for the entire quilt because I ran out and had to use a different fabric for the border and backing. 

Baby Quilt, 2011

This is the quilt I am most pleased with so far.  It has wonky stars in Katie Jump Rope fabric from Denyse Schmidt and one vintage turquoise flower fabric.  The rest is an ivory polka dot fabric.  I love the sawtooth border and the placement of the stars.  I also made scrappy binding and for the first time did machine quilting.  It went MUCH faster than quilting by hand! 


I'm guessing there will be many more quilts to come.  There have been a few other quilts I've made for friends and family that aren't shown here but I've tried to stay away from quilting as long as possible.  I hear it's addictive.

After this is posted I'm going to begin quilting the NEXT quilt.  Yikes.  It IS super addictive.

August 4, 2011

DIY Upholstery

The ingredients:

My grandmothers chair
Staple Gun
Denyse Schmidt County Fair Fabric
Foam and Batting
Stain and Polyurethane
Sandpaper


Place in a garage in 97 degree heat, 70 percent humidity for 6 hours.  Add a sprinkle of perspiration and determination.

BEFORE


Slightly old foam - did I mention that my grandmother's chair she received as a wedding present over 55 years ago?

DURING


Tea Party (I couldn't resist)
AFTER

My, what beautiful pleats you have!!!


The "new" chair sits in our living room and is my new favorite place to sit!

February 21, 2011

Hear me ROAR...

 While perusing the crafty blogs after the birth of Harriet I saw THIS lion pillow on Anna Maria Horner's blog and I absolutely HAD to have it.  I needed it.  So what is a crafty mama to do - but shamefully copy.  Imitation is the greatest form of flattery - right? 

It makes me feel better that a I've seen a few other mamas making crocheted lion pillows too!

Here is my version - 


I hadn't crocheted in ages (okay - since college) but found that my fingers remembered what to do.  So I ran out and got some yarn and crocheted away.  I think I like my version a bit better - he looks like a very friendly lion. 


I chain stitched the facial features and sewed them on with a tapestry needle.  It was fun working with some yarn for a change.  I still miss my sewing - but I found that crocheting is an easy project to pick up and put down quickly - a necessity with two little ones around. 

He's gotten some good kisses from Lucy!

I can't resist posting a few one-month photos of our little Harriet!  She's been a wonderful baby!


 This is her signature frown.

December 29, 2010

Easy Fabric Alphabet

Make room in your fabric stash for fresh, funky and new fabrics by using up all those pesky scraps.  I hate it when my scrap pile grows out of the bin and starts exploding onto the floor.  This was my latest solution.

This project was fun and easy to do, not to mention you get to do some "TV sewing" (ie - cutting out shapes and layering fabrics) while watching your favorite shows!


I made 2 complete alphabet sets and added the letters to spell "LUCY" in matching fabrics.  I thought that this might be a fun spelling and word game as she grows older.  It's sure been popular with the adult crowds hanging around the toy bin!


HOW TO:
  • Print out the alphabet from Microsoft Word using the font Arial Black in size 300, Bold.  
  • Then cut out the letters with a scissors.
  •  Pick out your fabrics and sandwich some cotton batting (or fleece) between 2 layers of fabric with right sides out, wrong sides facing the batting
  • Taped the letters onto one side of the fabric sandwich (I used minimal amounts of scotch tape) and stitch around the edges of the letters and any other openings.  
  • Using a sharp pair of scissors trim the fabric 1/8" from the edge of the stitching line. 
The letters do shed a bit and so I threw them into the dryer.  I plan on trimming them as necessary.  I think next time I'll use pinking shears for the edges to reduce the amount of fraying.

Related Posts Plugin for WordPress, Blogger...