Showing posts with label fabric. Show all posts

September 17, 2012

Spiderweb Block tutorial and template


I've been slowly catching up on my sewing projects.  Preschool has started and so I have a few extra hours a week to work.  This is my first spiderweb block for Lee in my Bits and Pieces quilting bee group.  I hope to finish the other block tonight!  The finished block measures 10 3/4 inches.


The block Lee designed for her quilt and her tutorial can be found here:
Naturally Neutral and Webby Quilt.   
I've made a free template based on her instructions that you can download and print HERE.  


I'll show you the process of making this quilt block - if you scroll down really fast, maybe it will look animated! 


print out the template on 8.5 x 11 paper


cut along the dotted lines


Fold along these two lines.  It just occurred to me that I can put the fabric on the reverse side and eliminate this step!


Pin your solid color fabric in the center, leaving at least 1/4" fabric allowance on each edge.


add various sized strips to each side to cover the paper all the way to the edge.


press the paper and fabric to make it behave.


trim along all edges, right up to the paper.


it's looking pretty!


repeat three more times


play around with your triangles until you have them arranged just so


with the paper still attached, sew the triangle blocks together, then remove the papers.


viola!
 I should mention that you should use a small stitch width so that the papers are easy to rip off of the fabrics.  I used two different ways to sew the strips together, 1. sewing the papers and strips together (like paper piecing) and 2. just sewing a bunch of strips together and then placing on the edge.  The second method was easier, but I liked sewing to the paper for stability and for using up my really small scraps.  

Happy sewing!

June 7, 2012

Summer sewing!

I've been busy doing  "summer sewing" projects!  Baseball uniforms, aprons, hems, alterations, curtains, wiksten tank tops, shorts, and so much more!  I honestly don't have enough time in one day to complete 1/100th of the things on my "To Sew" list. 

We have also been enjoying the wonderful weather.  Ice cream cones, backyard explorations, and trips to the zoo are our favorites.


What's on your "to sew" list? 
I'd love to make a chiffon button down top and a chambray dress.

February 6, 2012

Curved Nine Patch Block Tutorial

February Block Inspirations by owlybaby
February Block Inspirations, a photo by owlybaby on Flickr.

These are my inspiration photos for my February Bits and Pieces Bee.  The top 4 photos (row 1) show the block that we will be making and the bottom 3 rows show my color inspirations.  I know I'm super late to the aqua and red party, but the colors look so fresh together.  Especially when I see juicy strawberries in a beautiful aqua colander! 


The pattern for this block can be found HERE.  It's a free pattern from ConnectingThreads.com called Curved Nine Patch.  You will only need to print out the last page of the document with the template pieces.  

I'm hoping people will do either 1 block of red and 1 block of aqua OR two blocks of aqua.  I was pulling fabrics from my stash and noticed that I have lots of red fabrics but very few aqua fabrics.  If you aren't afraid of curved piecing, it would be great if you could add the white curve to 2 sides of each block.  You don't need to add it to each side because the block "share" this piece. (this is not shown)


CURVED NINE PATCH TUTORIAL
So, let's get started! These instructions will cover the steps you will take to complete one block.  

You will need the template pieces A, B, C and D.  We are going to modify template piece D.  
To modify piece D - Cut out the template piece on the solid lines for the curved side and notches for cutting at the top and bottom.  Cut along the DOTTED LINE for the long straight edge.  Then, on a new sheet of paper, trace around the entire piece.  Flip the pattern piece right side down and align the long straight edge of the template with the long straight edge that you have just drawn.  Trace the curve and notches on this side.  You will end up with a long oval-ish template piece.  This is the new template D.  Don't worry too much about marking the middle.  


Now, you will need to gather your fabrics and cut the following pieces.  
Piece A - cut 1.  This is the center block.  
Piece B - cut 4.  Notice the slight curve in one side.  
Piece C - cut 4.  
Piece D - use white fabric.  Cut 2 per block. 

Arrange your pieces until you are happy with the layout. 


Now comes the sewing! Join the pieces using a .25" seam allowance.  Sew 3 rows of squares together.  Don't forget to face the curved edge on piece B to the outside.  Yes, I changed my layout - sorry about that! 
Now, join your rows.  I pressed my seams open, but I don't think it will matter too much in this block.
Make another block, if desired.  


Follow these directions to add the curved white piece.  Never fear, curved piecing is a breeze and nothing to be worried about.  First, fold piece D and your nine patch block to find the centers.  Match the centers up and pin.  


Then, match up each corner piece and pin.  If you are brave or experienced, you can usually skip this part. 
If pins make you feel more in-control, add one more pin between the center and edges on each side. 

Now, I find it easiest to sew with the convex piece on the bottom.  Sew along the curved edge, matching edges as you go.  Take care not to stretch or pull fabrics, but gently guide the edges so they curve together.  I like to match the edges as I go and work 3 inches or so in front of the presser foot.  Notice - to the left of the presser foot there are *gasp* bubbles.  These are necessary at this point.  They will extend almost to the .25" seam allowance but not to the edge.
After sewing, you will have a bowl-ish shaped edge. 
March it over to your pressing board and press the seam allowance away from the white piece.  
 Now, repeat the last step for one other edge.  How about we all plan to do the opposite edge? 

If you'd like to know how to join the pieces together to make a quilt, just continue adding nine patches and curves until it's you're desired size.


Thanks so much to the great ladies from the Bits and Pieces Quilting Bee.  I'm so excited to see your blocks!!  Also - if you don't have enough fabric of the correct color to make a block, let me know and I'll happily mail you a package! 

December 14, 2011

Destash Sale!

I'm cleaning out my fabric closet this week and destashing some extra yardage.  

I'm feeling like I want a nice clean start to the new year. 


My cleaning days can be your new fabric days!

Have fun browsing and maybe pre-spending your holiday $.  

Check it out here:   SHOP destash fabrics

Also - don't forget about the 20% sale 
on all sewing patterns at Owly Baby.  
Use the code HOLIDAY20
upon checkout.  


Happy shopping!


November 15, 2010

Fun Fabrics and Aprons

I've just picked up a beautiful assortment of fabrics at a local shop "Fourth and Main" in Cannon Falls.  The shop is filled with bolts and bolts of fancy fabrics.   Unfortunately they don't have a website to visit, but you can see photos of the store
HERE.  I love the tin ceiling, the vintage lights and the rows and rows of colorful fabrics!


The green polka dots and brown and cream swirly print were just used to make a fun, ruffly apron.  I'm working on a few test aprons for a holiday apron pattern.  
I've finished my first test apron and although it's cute, it's a bit too ruffly for my taste. 


My favorite part of this apron is the pocket.  It ties at the top and forms a "basket" shape.  Perfect for your cell phone, fruit snacks or sippy cup storage.  I think I'll call it a basket pocket.


The goal is for the final pattern package to include sizes for dolls, toddlers, children, women and plus sizes!


Fourth and Main fabrics has also placed an order to carry some of my patterns!  A few of the dress and skirt patterns will be available in a print version in their store starting on Tuesday.  I think I'll have to go visit just to see them hanging there!

November 10, 2010

Review of Betsy Pillowcase Dress Pattern

I was  happily surprised this evening to find that a fellow crafter has written a review of the Betsy Pillowcase Dress Pattern on her blog!  She tried out the Betsy Dress pattern and made 2 beautiful dresses so far!  You can check out the review and photos of her work HERE on her blog Fabric Flair.

Her shop on Etsy is full of bright and beautiful designer fabrics!  
 

Here are a few of my favorites fabrics in her shop!  

These would make a super-cute nursery quilt/sheet/curtains set.

I would love a cute, fitted dress in this fabric!

I'm such a sucker for oversized, saturated colors like these from Anna Maria Horner!  I especially love the print in the top right - the pinwheels make me think of sunny summer days....
(fabric photos taken by Fabric Flair)

November 5, 2010

Embroidery Hoop Nursery Decor

I'm so excited to share some nursery decor a la cheap!  My favorite source of inspiration is Apartment Therapy - OhDeeDoh.  I drew the color palette for Lucy's room from this nursery featured last year.   It's so sweet and I LOVE the yellow crib.

Here is a close up of their embroidery hoop art.  So cute AND affordable!

The embroidery hoop art is catching on - like this one:

Or those circles in the corner:

Or behind this lovely yellow chair:

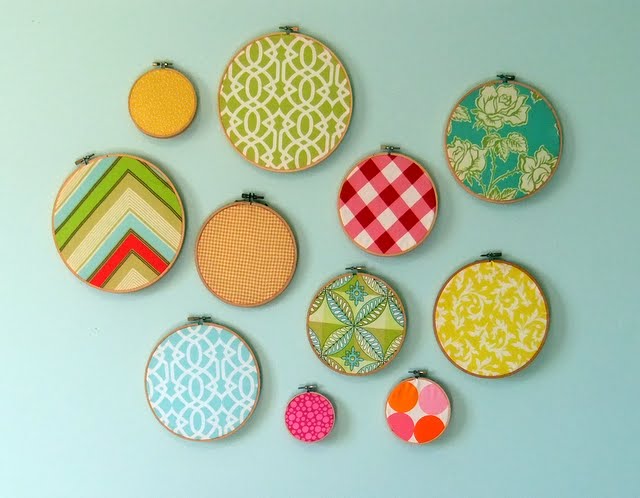
So I decided to use some of my favorite fabrics and make my own!  

It was very easy and I got all of the embroidery hoops at a local thrift store for a total of $3.50!
What I love most is that the fabrics are so easy to change and the whole project is sewing, glue, and staple free!  You just lay the fabric over the hoop and tighten!

Stay tuned for a tutorial on Embroidered Linen Nursery Art coming soon!  It's super easy AND might become my go-to-shower gift idea (besides burp cloths and a cute dress).
Related Posts Plugin for WordPress, Blogger...