Showing posts with label embroidery. Show all posts

January 19, 2012

::on the worktable::

I got a little hung up on rick-rack and was imagining a cute little peter pan collar edged with rick-rack.  Here is the result.


The white dress is a wee bit small for Lucy - so I had to make another slightly larger.  She's in a size 3 already!  When did that happen?  I'm soo in love with this little dress!


It's 25 below zero today, so it should be called frostbite dress.  Any ideas on names for the new pattern?


Can you see how small it is?  Uber-constricting for an almost 3 year old!

Who loves polka dots?  This is my favorite version!


It's also Hattie's first birthday today!  It seems very fitting that she was born on a -21 degree day and her first birthday is on a -25 degree day!  It may be cold outside but we can't get enough of her sunny personality!   She's already a charmer!


Fellow sewists - advice?
You might notice that from the first version of the dress to the polka dot version I changed a bit. I wanted the collar to be more prominent and I changed the sleeves to a cap sleeve.  I think it looks much better.  I added the apron for fun, but then I had to add a side zipper - yech.  I'm still wondering if I even need the darts on the front of the dress.  Loose dresses look ok on little girls, right?  What are your opinions on darts for little girls and/or side zippers?

January 17, 2011

Extreme nesting

I'm now a few days overdue and I'm quite impatiently for baby to come.  The house has been kept clean, the dishes done, laundry folded, meals have been made and frozen....

There is nothing left to do but sew!  Keeping my hands busy has been a blessing and has kept my mind off of the sleepless nights to come...

Here is what I have been up to in the last few days. 

Completed Projects

Stacked Strip Quilt Pillow
I just got a walking foot and thought I should try my hand at quilting....so here is my attempt at a stacked strip pillow with cording.

The colors make me happy.

I had fun playing with my scrap pile - and rearranging the colors over and over...

It was also my first time making cording.  
I think the red and white stripes make the pillow quite playful.


Burp Cloths
I made a few new burp cloths for the baby (and a few for the shop)


Nursing Cover
I embroidered the bottom corner of my new nursing cover to give it some pizazz.  It's also fitting for Valentine's day coming up!

I stumbled upon some beautiful quilts while looking for inspiration for my stacked strip quilt pillow.  A few of the quilts were made of hexagons that had been hand pieced.  I thought I would give the hexagons a try and now I'm hooked! 

The hand sewing involved in paper piecing is very therapeutic and almost addictive.  I know it will be a work in progress for quite a while - but piecing hexagons is great for using up scraps AND it's a great on-the-go projects (think car rides, waiting rooms, etc..).
Travel Sewing Case
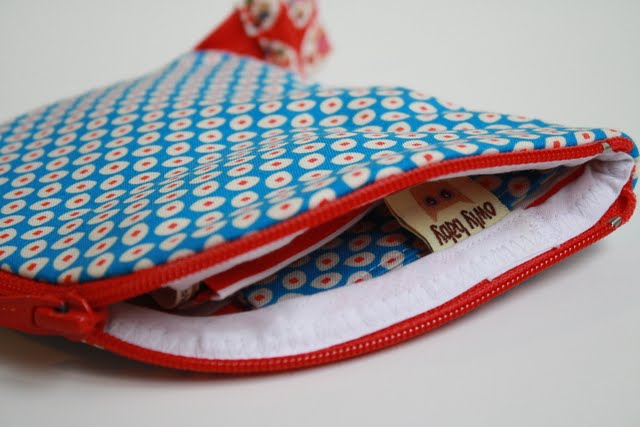
So I HAD to make a little travel sewing case for my hexagon sewing supplies.  I'm so proud of this little zipper case I spent about 10 minutes just opening and closing it last night for my husband.  He was still trying to be impressed after the 15th time...so nice of him!


It holds just the bare necessities for paper piecing hexagons or other small sewing projects.

Do you see the hexagons peeking out?  They're calling my name...sew me...

Paper Pieced Hexagons

My small stack of finished hexagons.  So fun!

 Works in progress


Embroidered Artwork
I started another embroidery project - this one will hang in the kitchen.  I'm fairly new at reverse applique, but I like how it turned out.  
It's not perfect but I think there is a certain kind of beauty in the imperfections.

I think I'm reaching maximum nesting potential.  This was all accomplished within the last 4 days.  Come on out, baby!

November 28, 2010

Thanksgiving Napkins

We use cloth napkins in our house (and cloth diapers too!).  We have a small collection of handmade napkins and a few that were gifts. 

(Here is where I refused to show a photo of our slightly stained napkins!)

While setting the table for Thanksgiving I noticed that I didn't have any fall/harvest themed napkins.  I wanted to make some napkins we could double as everyday napkins.  So... off I trotted to Target and picked up some plain green napkins.  I decided to embellish them with some simple hand embroidery.  

It's a perfect TV sewing project.  I like to embroider while watching Glee, The Office, or Parenthood!

I drew the design and transferred it with some carbon paper.  I used a running stitch so each napkin takes only about 15 minutes to sew. 
I used a variety of pretty colored embroidery flosses...

and finished my napkins just in time for Thanksgiving.  Our silverware is nicely tucked inside each napkin.

Because they're a bright grass green color - I think they will grace our table for Christmas and Easter too!

This would make a great holiday gift - it's always nice to have a few extra napkins around!

November 5, 2010

Tutorial: Embroidered Nursery Art

Keeping on the a la cheap theme - I've just made a new piece of artwork for our nursery.  I've been re-organizing the space since it will soon house 2 little girls. 

Here's what you'll need to make the Embroidered Nursery Art

We haven't completely decided on a name yet for the baby coming in January but the project was so quick and easy I decided to use the first inital anyways.  Any guesses on the name for the the letter "H"?

I got these frames last year at a local thrift store and spray painted them yellow.  But I couldn't decide what to do with them until now.  The frames are pretty small - about 5 x 7.

I used a piece of linen from my scrap pile and found a cool font in Microsoft Word.  Print it out and trace the design with some carbon transfer paper underneath.  You could also just try to trace the design by holding the linen over the printout in a sunny window.

Embroider the letters with the smallest stitches possible.  You can search for a video on how to embroider if you haven't embroidered before.  It's actually pretty easy.  I used a back stitch.  This actually is a great project to do while watching "The Office" or "Parenthood".  Two of my favorite shows.

Then, trace 2 ovals the size of the opening on some cardboard and cut them out.  I used an Oatmeal Squares cereal box.

Using some leftover embroidery floss or thread - make a running stitch around the design leaving an inch outside of where the cardboard circle will be.

This part can get tricky - now pull the loose ends of the running stitch taut and place some batting or  fabric scraps inside to "pouf" the design. Slip one piece of cardboard just inside the running stitch.  Tie the running stitch ends closed. 


I had to play around with the cardboard and the batting to get the design more or less centered and evenly "poufed".  I thought it needed to be stretched a bit more - so I laced it up the back with another set of stitches in a zig zag pattern.

Add some hot glue to the back and lay the second piece of cardboard to cover your stitches in the back.

Then run a small bead of glue along the lip of your picture frame and carefully place your puffy embroidery inside.  Don't stop to take a photo or the hot glue will become cold glue!
I hope you at least give embroidery a try!  The embroidery floss only costs 29 cents and needles are cheap too! 

This would also look great with a silhouette or in a square frame with the entire name embroidered. 

Holiday gifts anyone?
Related Posts Plugin for WordPress, Blogger...