February 14, 2012

Rainbow Barf

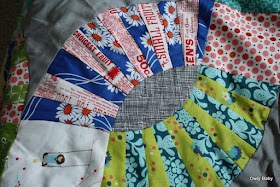
I feel like I have a dirty secret.  The secret is this quilt I've been working on for ME!  I have made quite a few quilts now, but never a quilt for myself.   This quilt has been affectionately dubbed "Rainbow Barf" around our home - mostly for the obnoxious use of color and the arcs shapes.

When I decided I wanted to make a quilt for myself, I planned and schemed and researched and finally decided to do a pickle dish/double wedding ring quilt.  I can't tell the difference between those two patterns.  I was inspired by the awesome quilt in the book Material Obsession 2.

Material Obsession 2
Can you see it, on the left and draped on the chair?
(photo from "http://www.flickr.com/photos/theworkroom/)

I'm far too cheap to purchase a pattern, so I drafted up the pattern on the computer and set to work cutting and piecing.  It hasn't taken too long, I've been working on the quilt for about 1 month at various intervals between LOTS of other sewing.


 These are some of my favorite combos.  I have no idea why!  They can be a bit in-your-face color-wise.


The quilt has a scrap of *almost* every fabric I own!  It's been very fun to match the arc fabrics based on value (light/dark) instead of by color.  To match them I used my camera in black and white mode and took photos of the fabrics. This ensures that there is a good amount of contrast in the arcs.  Sometimes if you just squint really hard at the fabrics - you can get a good test of value.  If the colors both mesh together (like the light purple and green in the photo below), then there isn't much value difference.  If one color stands out (like the woodgrain and pink tiles below) there is a high contrast/difference in value.


I'm using polyester batting *gasp* because I don't like heavy quilts.  This baby is BIG!  It's about 82" x 82".  I've just started the hand quilting and it's been very relaxing! The backing is a large 1" check gingham in a mint color - you can see it at the bottom left and right on the photo below.


This last photo shows how I've been quilting it.  I'm skipping every other "ray" and quilting with perle cotton in size 10. 

I feel much better now that I've shared my "secret" (and selfish?) quilt.

February 10, 2012

Ryan Gosling Hilarity

These images have made me *almost* fall off my chair in fits of laughter.  My husband didn't so much agree - but I think they're the funniest thing I've seen in YEARS!

http://handmaderyangosling.tumblr.com/

Here are some of my favorites...  (all photos from handmadebyryangosling.tumblr.com)


They get me every time!  Check out more at http://handmadeRyanGosling.tumblr.com    This sure brightens my day!

February 6, 2012

Curved Nine Patch Block Tutorial

February Block Inspirations by owlybaby
February Block Inspirations, a photo by owlybaby on Flickr.

These are my inspiration photos for my February Bits and Pieces Bee.  The top 4 photos (row 1) show the block that we will be making and the bottom 3 rows show my color inspirations.  I know I'm super late to the aqua and red party, but the colors look so fresh together.  Especially when I see juicy strawberries in a beautiful aqua colander! 


The pattern for this block can be found HERE.  It's a free pattern from ConnectingThreads.com called Curved Nine Patch.  You will only need to print out the last page of the document with the template pieces.  

I'm hoping people will do either 1 block of red and 1 block of aqua OR two blocks of aqua.  I was pulling fabrics from my stash and noticed that I have lots of red fabrics but very few aqua fabrics.  If you aren't afraid of curved piecing, it would be great if you could add the white curve to 2 sides of each block.  You don't need to add it to each side because the block "share" this piece. (this is not shown)


CURVED NINE PATCH TUTORIAL
So, let's get started! These instructions will cover the steps you will take to complete one block.  

You will need the template pieces A, B, C and D.  We are going to modify template piece D.  
To modify piece D - Cut out the template piece on the solid lines for the curved side and notches for cutting at the top and bottom.  Cut along the DOTTED LINE for the long straight edge.  Then, on a new sheet of paper, trace around the entire piece.  Flip the pattern piece right side down and align the long straight edge of the template with the long straight edge that you have just drawn.  Trace the curve and notches on this side.  You will end up with a long oval-ish template piece.  This is the new template D.  Don't worry too much about marking the middle.  


Now, you will need to gather your fabrics and cut the following pieces.  
Piece A - cut 1.  This is the center block.  
Piece B - cut 4.  Notice the slight curve in one side.  
Piece C - cut 4.  
Piece D - use white fabric.  Cut 2 per block. 

Arrange your pieces until you are happy with the layout. 


Now comes the sewing! Join the pieces using a .25" seam allowance.  Sew 3 rows of squares together.  Don't forget to face the curved edge on piece B to the outside.  Yes, I changed my layout - sorry about that! 
Now, join your rows.  I pressed my seams open, but I don't think it will matter too much in this block.
Make another block, if desired.  


Follow these directions to add the curved white piece.  Never fear, curved piecing is a breeze and nothing to be worried about.  First, fold piece D and your nine patch block to find the centers.  Match the centers up and pin.  


Then, match up each corner piece and pin.  If you are brave or experienced, you can usually skip this part. 
If pins make you feel more in-control, add one more pin between the center and edges on each side. 

Now, I find it easiest to sew with the convex piece on the bottom.  Sew along the curved edge, matching edges as you go.  Take care not to stretch or pull fabrics, but gently guide the edges so they curve together.  I like to match the edges as I go and work 3 inches or so in front of the presser foot.  Notice - to the left of the presser foot there are *gasp* bubbles.  These are necessary at this point.  They will extend almost to the .25" seam allowance but not to the edge.
After sewing, you will have a bowl-ish shaped edge. 
March it over to your pressing board and press the seam allowance away from the white piece.  
 Now, repeat the last step for one other edge.  How about we all plan to do the opposite edge? 

If you'd like to know how to join the pieces together to make a quilt, just continue adding nine patches and curves until it's you're desired size.


Thanks so much to the great ladies from the Bits and Pieces Quilting Bee.  I'm so excited to see your blocks!!  Also - if you don't have enough fabric of the correct color to make a block, let me know and I'll happily mail you a package! 

February 5, 2012

A peek into the stash

This is a (big) peek into my stash for a fellow friendly sewist!

First up, the FMF!  This is every scrap that I own! 


Then - the (other) Denyse Schmidt fabrics.
Katie Jump Rope

Hope Valley

Greenfield Hill

Joann Fabrics - DS Quilts


Next up, my only Japanese prints.
This is one panel with the full alphabet.

All 3 are Kei, except the elephants, not sure what those are.
And for the grand finale - lots of dots and a few stripes.
H. Bailey, A.Henry, H.Bailey, Urban Chicks, (unsure of the red dot and yellow dots), then a trio of Laurie Wisburn

AMH Polka line, 2x Loulouthi hugs and kisses, Polka line, some random green stripe, polka line again!, then 5 different Kaffe Fasset dots, random red stripe.

Urban Chicks 1974 dots, Amy Butler sunspots, P&B Textiles red/white dots, Paula Prass Cobblestone, Red white stripe is P&B Textiles, 1974 Urban Chicks Plaid, 2x red/white stripes

Amy Butler sunspots, random turquoise dots, Kaffe Fasset dots, Full Moon Dot Amy Butler in Orange, Sunspots (again!) and the Ruby stripe/Scallop.

This was so much fun to pull out fabrics, organize and whatnot! :)

New tablecloth! Score!


I got a major score the other day at a local fabric store.  I've always loved this fabric and have never found it for sale, but FINALLY I found it and bought every inch of fabric that the store had in stock!  The fabric never even made it into my closet - but was made into a tablecloth for our dining room table.  I LOVE seeing those happy little birds!